EPM Automate is a command line utility to automate common tasks for Oracle EPM Cloud applications, like PBCS, FCCS, ARCS, EDMCS etc. Keep reading to find out how to set it up. First you need to download and install the client utility, then we recommend to configure each environment using a configuration file which simplifies maintaining the processes:
- Download and Install EPM Automate
- Configure EPM Automate Environment
- Gather Information about your Application
- Create a Parameter file
- Create Encrypted Password file
- Test Login to Oracle EPM Cloud
Download and Install EPM Automate
Here are the steps to download and install the utility:
- Log in to your Oracle EPM Cloud application
- Click on your user name in the top right corner and open the
Downloadspage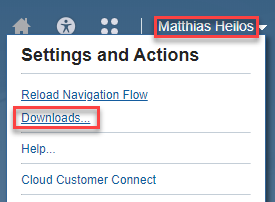
- Download the Utility for your operating system: Windows or Linux/Max
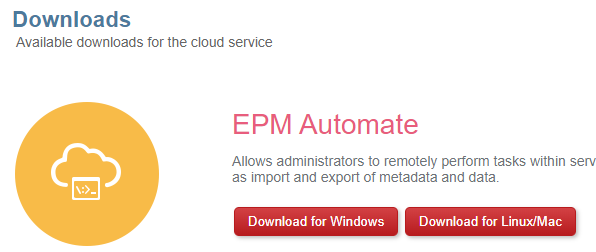
- Save the file (depending on your browser and operating system, it might automatically be saved to your Downloads folder)
- The name of the downloaded file is
EPM Automate.exe. Right-click on the file and chooseRun as Administratorand follow the instructions. By default, the installer creates a folder calledC:\Oracle\EPM Automatewhich can be used unless you want to create it in a different folder.
Why would you want to move the EPM Automate client to a different folder?
You should install EPM Automate on a computer and in a location on the file system that a) you CAN access easily, but b) any unauthorized users CANNOT access easily.
Please note: accessing the EPM Automate folder can be tricky and make life unnecessarily complicated, especially when you are not in the office or connected to VPN. <Here> is a solution to this problem.
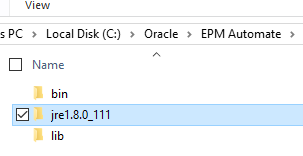
After downloading and installing the client utility you will see the following subfolders in your installation directory (by default: C:\Oracle\EPM Automate):
Configure EPM Automate Environment
This step is optional, but after setting up EPM Automate we highly recommend to create a parameter file so that you can manage environment specific information in one place rather than having to update the information in multiple places. This will save you a lot of time and hassle when updating user credentials as well as after migrating the files to a different environment (e.g. from TEST to PROD).
Please note: in this example we are going to connect to a PBCS application, but it could just as well be FCCS, ARCS, EDMCS etc.
Gather Information about your Application
You will need the following information in order to connect to your EPM Cloud application:
- EPM Cloud URL
- Domain Id
- Username
- Password
Create a Parameter File
Create a file named epm_init.bat and add the following lines (please note: REM indicates that a comment is following, used to describe the information that is provided):
REM path to EPM Automate batch script
SET EPM_AUTOMATE_PATH="C:\Oracle\EPM Automate\bin\epmautomate.bat"
REM URL of EPM Cloud environment
SET EPM_CLOUD_URL=https://planning-test-a123456.pbcs.us2.oraclecloud.com
REM EPM Cloud Credentials - Username
SET USERNAME=admin@mycompany.com
REM EPM Cloud Credentials - Password file
SET PASSWORD_FILE=myPassword.epw
Login to Oracle EPM Cloud
Let’s test if we were setting up EPM Automate correctly. Use the following script to connect to your Oracle EPM Cloud instance using EPM Automate (the Parameter password can be set to a plain text password or a password file):
call epm_init.bat
%EPM_AUTOMATE_PATH% login %USERNAME% %PASSWORD_FILE% %EPM_CLOUD_URL%
If the login was successful, a file will be created in the folder from which you called the script. This file contains login information (i.e a login “token”) and will exist until you delete it. When you call the login command, the file will be refreshed with a new login token.